MicVol Documentation
Monitor real-time microphone volume in GameMaker.
MicVol is a GameMaker extension that lets you easily monitor microphone volume in real time. You can use this to add audio-reactivity to your game, or make a streaming overlay "PNGTuber" application.
WaveForm, my free extension that lets you calculate audio peaks, is included as part of MicVol. The extension includes a full demo, and detailed documentation can be found below.
Quick start
Here's a basic example of how to start listening to the user's microphone:
A quick note is that these functions create instances under the hood, and so they can't be used on the first frame of the game.
Choosing a microphone
In order to get started with actively monitoring microphone volume levels, you need to pick a microphone to listen to. The included demo has a helper function show_mic_selector_debug() that shows the basic flow for selecting a microphone using GameMaker's native functions for microphone information. If you want the user to be able to select their own microphone, you'll probably want to implement your own UI for this, but here's a simple example to demonstrate how it should go:
An alternative to having the user selecting the microphone manually, is by using the find_active_mic() function. A basic example of how to use it is shown in the Quick Start section above. This function automatically listens to each microphone detected one at a time, and if any of them contain any audio data (i.e. they hear something) then this function will return the index of that microphone in a callback. It has an optional second parameter to specify how long to listen to each microphone for. By default, this value is 0.5 (or half a second).
Understanding microphone levels
As seen in the Quick Start example, listening to a microphone (once you know which one you want to listen to) is straightforward. The callback function that you pass to start_listening() receives a struct containing a few different kinds of levels:
When recording audio in GameMaker, the engine receives audio samples from the microphone once per frame (except HTML5, which happens somewhere around every 100ms). This means that GameMaker receives chunks of audio at a time, approximately 16ms of audio for a game with 60fps. Under the hood, MicVol examines this chunk of audio data and returns a few different kinds of measurements. All of these levels are given as values between 0 and 1.
The peak level (or just level) is the highest level of audio in the recorded segment. Most likely, this is the value that you will want to use in your application, as it is the most accurate representation of volume level.
The average level is the average volume of the entire segment of recorded audio. This value may be a good fallback for PNGTuber applications where the user might have a noisy environment, as this value is less likely to spike for quick and loud background sounds.
The perceptual level is the same as the peak level, but it goes down slowly after peaking. This value is good for visualizations of volume, since it makes it easier to see new peaks and doesn't jump around as much. The rate at which this value decays is 0.02 by default, but you may want to change this for different framerates. It is given as the optional last argument to start_listening().
Stop listening
When you begin listening to microphone volume, there is a chance that the audio device may fail to begin recording. In these (very) rare cases, the start_listening() callback struct will have ended: true to indicate this. No further action is needed if this happens, but you may want to try to start listening again after this happens.
If you're already listening to microphone levels and want to stop, you can use stop_listening() by passing in the microphone index you previously listened to:
Creating a PNGTuber application
The included demo has a basic example for making a character in your application appear to be talking when it detects microphone levels. Some basic considerations are included, such as volume threshold, and how long levels need to be above that threshold in order for it to be considered "speech" (threshold_frames in the demo object). Once you've tuned things to your taste, here's how to use the application as a stream overlay with OBS.
The first thing you'll need to do, is to disable any background layers in your room. In addition, you'll want to add draw_clear_alpha(0, 0) to a "draw begin" event somewhere. Once you've done this, you're ready to run your game and move over to OBS.
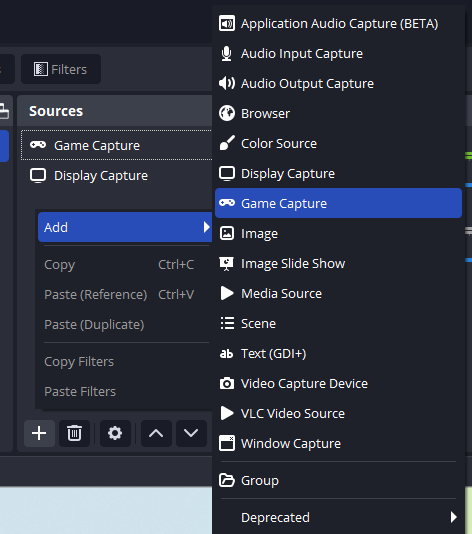
Inside of OBS, right click inside the "Sources" panel, and add a "Game Capture" source.

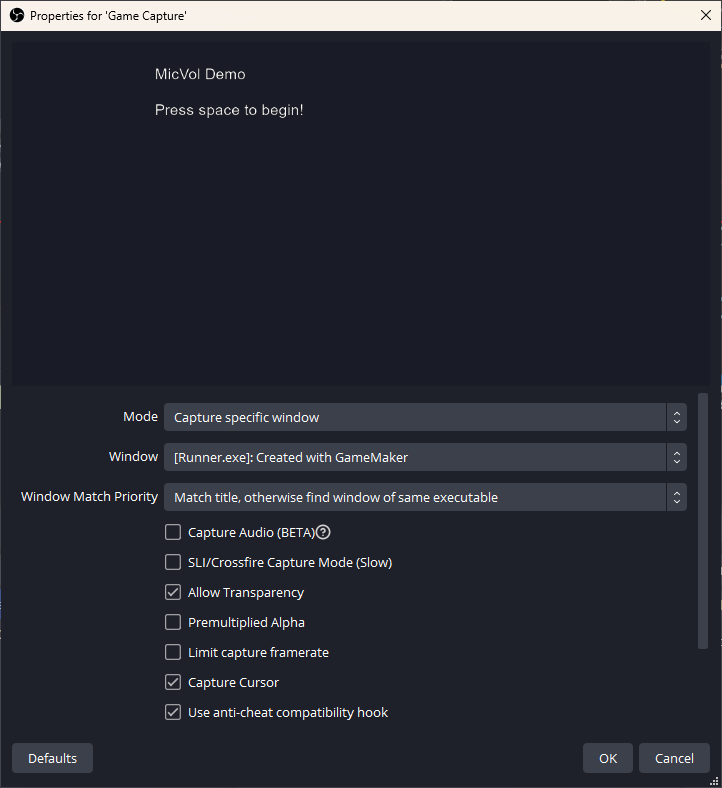
Next, double click on the "Game Capture" item, and select your game window in the "Window" drop down. Make sure to select "Allow Transparency" in the options below.

After this, click on "OK" and you should see your game in your OBS output preview.
Index
start_listening(mic_index, callback, [perceptual_decay])- Begins listening to a microphone for volume levelsstop_listening(mic_index)- Stops listening to a microphone that has been passed tostart_listeningfind_active_mic(callback, [listen_time])- Listens to each microphone detected to find one that has recordable levels